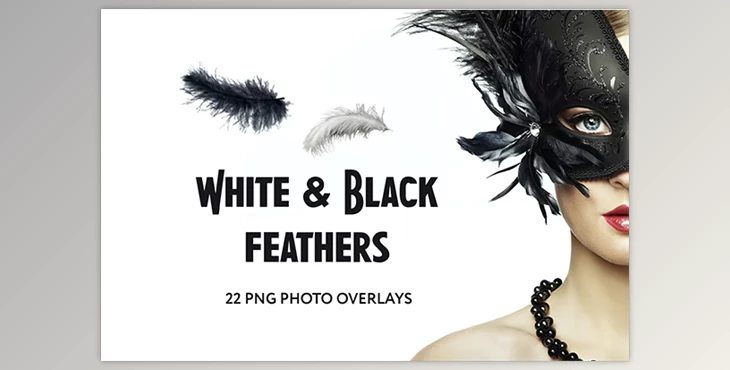
22 White and Black feathers Photo Overlays GR - 34831392:
Imagine your pictures with these White as well as Black feathers ...
There's a set of 22 White and Black feathers effects for photos that will help you work better.
It's difficult to get the perfect shot however, you must get the best result fast and effortlessly. Don't waste time and enjoy the results with overlays in Photoshop!
Details and Specifications of 22 Black and White feathers Set of Photo overlays:
22PNG files with Width Max 2000 pixels Min 460 pixels - High resolution. Refer to the video instructions:
Please be aware
- Once you have completed downloading, archive 084. 22 Black and White feathers Overlays.jpg' Overlays.zip is downloaded into the 'Downloads' folder or the folder you chose. 2. Unzip the archive to an appropriate folder. Don't be disappointed by images that have an uncolored background. Screen Blend Mode allows users to erase the black background by showing only the objects within Photoshop. 3. Open Photoshop, open an image that you intend to apply and follow the steps in the following steps.
INSTRUCTIONS
There are 3 methods for applying photo overlays. 1. - by using overlay actions (include) 2nd Utilizing Quickstart PSD course (include only in the PRO version) 3rd - the standard Drag'n'Drop technique.
1ST MODE: OVERLAYS ACTION
This approach is more advanced as it permits you to easily apply overlays to any directory, and even with other retailers. When you set the parameters of this action you are able to make an F3 hotkey (for instance) so that with one press you can make this action 1. Double-click on the overlay Actions .atn file to open it in Photoshop. After installation, you can access the Actions panel inside Photoshop by clicking "Window > Actions". There are two actions available: JPEG and PNG Overlays. The main difference between Overlay Action JPEG and Overlay Action PNG is that JPEG uses screen blend Mode. 2. Look for 'Overlays Action Click Play the action you want to play. 3. The dialog box for Photoshop opens and asks you to choose the image. Select 'Continue', then locate the folder that you have unzipped, and choose the picture you like. The image will be immediately uploaded into the Photoshop image file, where it is displayed. 4. Reflect, scale, or rotate the overlay, if you wish. five. Click the Cmd (Ctrl) and enter, and the operation will result in two-layer masks and adjustment layers. If needed, use a black brush to the layer mask in order to cover the image, if necessary and, in the correction layers alter the Levels or color to make sure the overlay appears suitable for the image. 6. Save the image, and then show it to your customers. They will be delighted by the outcome
2nd MODE 2nd WAY: Quickstart PSD COURSE
This allows you to work within a Photoshop file and then select the overlay you prefer and make layers visible. This is useful because it is visible on the thumbnails for layers of the image however, it's a hassle to use in certain variations that use Photoshop the file might not properly open. This is an optional feature and is included as is.
3RD WAY: DRAG'N'DROP
3.1 Drag the folder to any image you want to place within the Photoshop file. If the image has a black background, apply screen-blending Mode. To alter the blend mode when you double-click the image, the window for styles will appear. Select the desired blend mode, then move on through the steps. If overlays have transparent backgrounds there is no need to change anything. 3.2 Scale or transform the opacity or even add the Layer Mask and paint on your Overlay if required.
Download 22 White and Black feathers Photo Overlays GraphicRiver - 34831392 from the below link now!
Dear user, you must first login to your account to write your comment.
Please click here to Log in

Files Password : gfxplugin.com