Downloadable Files
You can download the product Parallax Node for free at the end of this page.
Add Real Depth to Your Materials
Creating realistic surface depth in Blender usually means adding more geometry or building complicated shader node setups. But what if you could achieve impressive depth effects with a much simpler workflow?
Parallax Node is designed exactly for that purpose. Instead of dealing with complex parallax node groups, this tool gives you a single smart node that handles everything internally. It keeps your shader setup clean, fast, and much easier to control while still producing detailed depth illusions on flat surfaces.
Whether you are building bricks, stones, floor tiles, sci-fi panels, or detailed game assets, this node can instantly make surfaces feel richer and more alive.
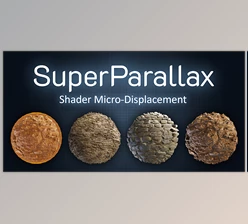
What is Parallax Mapping?
Parallax Mapping is a technique used to give the perception of depth to flat surfaces in 3D software by utilizing a height map and shifting the texture coordinates based on that height map and the viewing angle of the model.
This technique gives the model the appearance of having depth without adding any additional geometry to the model.
This is an incredibly useful technique for 3D artists, as it allows them to create the visual complexity necessary for detailed products, game assets, and models while minimizing the computational power required of the computer to display those models.
Why It Improves Visual Quality
- Surfaces look more realistic from different camera angles.
- Materials gain a stronger sense of depth and volume.
- Scenes remain optimized because no extra geometry is required.
- Perfect for games, animations, architectural visualization, and product rendering.
For example:
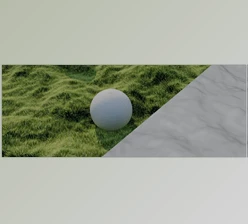
- Brick walls can appear deeply carved.
- Cobblestone roads feel uneven and natural.
- Metal panels can show engraved details without modeling them manually.
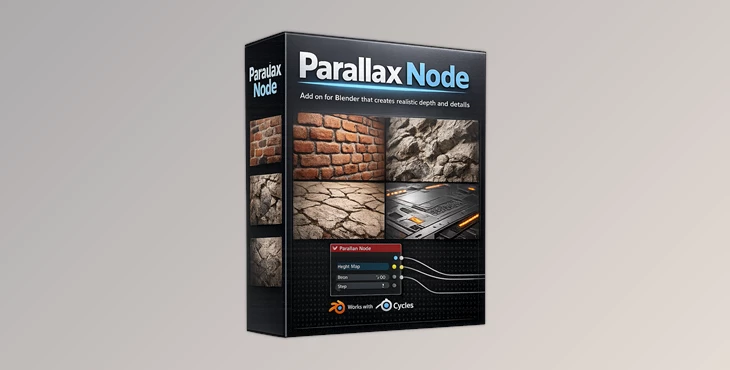
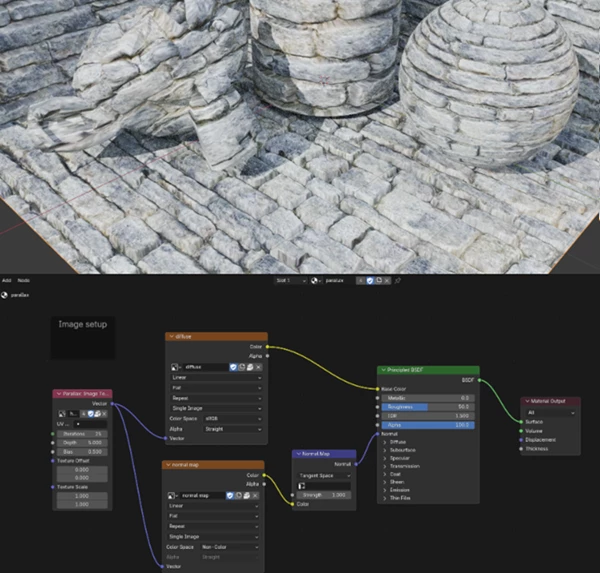
Meet the Parallax Node
Unlike traditional parallax setups that rely on large and confusing node groups, Parallax Node simplifies the entire workflow into one professional shader node.
The most impressive part is its user-friendly design. The Height Map texture is built directly inside the node, and you can control the iteration quality internally using the Step parameter.
This creates a cleaner node editor, faster setup times, and a much smoother workflow for artists of all skill levels.
Features
Smart Single-Node Workflow
Instead of using a massive shader network, everything is controlled from one dedicated node. This makes materials easier to organize and edit.
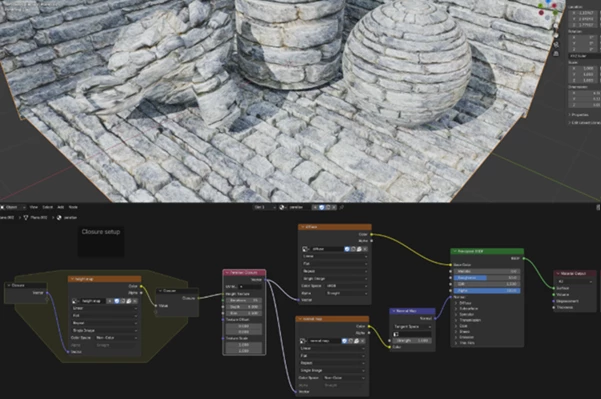
New Parallax Closure Node
The new version introduces a powerful Parallax Closure system that supports injecting different texture types, not only images.
This gives artists much more flexibility when building advanced procedural materials.
Faster Shader Compilation
Using Blender Shader Repeat Zones allows shaders to compile only once, improving performance and responsiveness during material editing.
Orthographic & Panoramic Camera Support
The node now works correctly with:
- Perspective cameras
- Orthographic cameras
- Panoramic rendering
This makes it more reliable for professional rendering workflows.
UV Scale & Offset Controls
You can directly scale and offset UV coordinates inside the node, giving you faster texture alignment and adjustment.
Adjustable Quality Settings
The Step parameter allows you to balance:
- Better visual accuracy
- Faster rendering performance
Lower values render faster, while higher values create smoother depth transitions.
Real-Time Compatibility
Works in:
- Cycles
- EEVEE
This allows artists to preview results interactively while working.
Real Project Benefits
Using Parallax Node can dramatically improve:
- Game environment materials
- Sci-fi panels
- Stone surfaces
- Floor textures
- Architectural walls
- Procedural shaders
Instead of modeling thousands of extra details, artists can create convincing depth using textures alone.
This speeds up production while keeping scenes optimized.
Pro Tips for Better Results
Use High-Quality Height Maps
Clean height maps produce smoother and more convincing depth effects. Avoid noisy grayscale textures whenever possible.
Balance the Step Count
Higher iteration counts improve realism but can affect performance. Start with medium values and increase only when necessary.
Combine with Normal Maps
Parallax effects become even more realistic when combined with detailed normal maps.
Avoid Over-Exaggeration
Subtle depth usually looks more natural than extremely strong displacement effects.
Test Different Viewing Angles
Parallax mapping shines most when viewed from angled perspectives, so always preview materials from multiple camera positions.
Final Thoughts
The Parallax Node for Blender makes it much easier for artists to add depth to their projects without adding complexity to their projects.
The fact that this add-on features support for various cameras, UV maps, and faster compilation times means it is a very useful tool for artists today.
Richer materials with fewer shader complications and with faster setup times will impress your clients and customers. Thus, the Parallax Node is definitely worth exploring.

Files Password : gfxplugin.com OR 123456