Downloadable Files
You can download MeshMorph for free from the bottom of this page.
Layer-Based Mesh Warping in After Effects and Premiere Pro
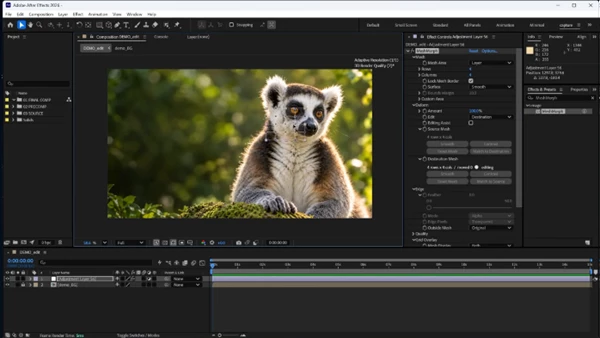
MeshMorph is a mesh warping plugin for After Effects and Premiere Pro that lets you reshape images, footage, text, and shapes by dragging points on a customizable grid. In After Effects, you can use an adjustment layer to distort everything underneath it or apply the effect directly to an individual layer.
One of its main advantages is that the mesh stays attached to the layer as you move, scale, rotate, or animate it. You can also create a complete warp using two meshes and control the transition between them with a single slider.
Reshape Layers Without Precomposing
In After Effects, MeshMorph turns an adjustment layer into an editable mesh. The adjustment layer's rectangular area defines where the distortion happens, and you can drag the grid points to change the appearance of everything beneath it.
The adjustment layer behaves like a normal layer, so you can reposition, resize, or rotate it without losing the warp. You can even make it a 3D layer, and the mesh will follow the camera perspective.
You also have several ways to control how the effect interacts with your composition:
Feathered boundaries: Blend the edges of the warp using Alpha, Displacement, or both.
Multiple warps: Place different MeshMorph effects on separate adjustment layers and combine them by enabling or disabling each layer.
Direct application: Apply the plugin directly to footage without creating an adjustment layer. MeshMorph automatically switches to Custom mode and works inside the selected layer.
This gives you the flexibility to distort an entire area of a composition or focus on a single element.
Animate Mesh Distortion With One Slider
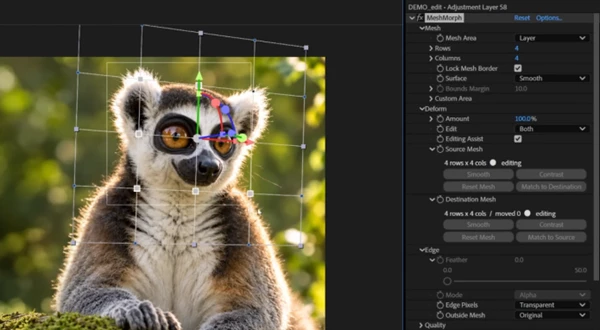
Animating a mesh usually involves adjusting multiple control points across different keyframes. MeshMorph offers a simpler approach through its Source and Destination meshes.
The Source mesh defines where the image starts, while the Destination mesh defines its final shape. Once you've created both, the Amount slider controls the transition between them.
| Amount | Result |
|---|---|
| 0 | Original Source mesh |
| 50 | Halfway between Source and Destination |
| 100 | Complete Destination mesh |
| Below 0 | Reverses the warp direction |
| Above 100 | Exaggerates the distortion |
The slider normally runs from 0 to 100, but you can manually enter values from -100 to 300 for more extreme results.
For a basic transformation, you only need to animate the Amount slider from 0 to 100. That means you can create a complete mesh transition using just two keyframes.
You aren't limited to this method, either. MeshMorph also supports direct keyframe animation of individual points on both meshes, similar to the built-in Mesh Warp effect.
More Control Over Mesh Editing
MeshMorph includes several editing tools that help you work with multiple grid points without constantly adjusting them one by one.
One particularly useful feature is Editing Assist. When enabled, it catches missed clicks so you don't accidentally move the layer or lose your selection while editing the mesh.
Other editing controls include:
Marquee selection: Select multiple points by dragging a selection area. Hold Shift to add points or Alt/Option to remove them.
Transform box: Move, scale, or rotate selected points together. Shift maintains proportions or snaps rotation to 15-degree increments, while Alt scales from the center.
Keyboard nudging: Move selected points by 1 pixel using the arrow keys or 10 pixels with Shift and the arrow keys.
One-click adjustments: Use Smooth, Contrast, Reset Mesh, and Match to commands to modify the mesh.
Edit Both: Adjust the Source mesh without distorting the image underneath.
Point color feedback: Grid points gradually change from gray to red based on how far they've moved.
These controls are particularly helpful when you're working with detailed distortions that involve many mesh points.
Automatically Fit the Mesh to Text and Shapes
MeshMorph isn't limited to images and footage. You can apply it directly to text and shape layers in After Effects.
When applied to one of these layers, the plugin automatically adjusts the mesh to fit the text or shape boundaries, leaving a small margin around the content.
The fitted mesh also follows changes to the layer. If you edit the text, move it, scale it, or rotate it, the mesh continues to follow the updated content.
You can also parent the layer to another object or make it 3D.
Important: After Effects has a rendering limitation with effects applied to 3D text and shape layers when using the Advanced 3D or Cinema 4D renderer. To work around this, use the Classic 3D renderer or precompose the warped text and make the precomposition layer 3D.
Choose Between Three Mesh Surface Types
MeshMorph provides three surface modes that determine how the image bends between control points.
| Surface | Behavior |
|---|---|
| Smooth | Creates smooth curves through mesh points without additional handles. |
| Linear | Uses straight lines between points for more angular distortions. |
| Bezier | Provides four handles per point for precise control over the curves. |
You can switch between these modes whenever you want without changing the positions of your mesh points.
For instance, Linear is suitable for creating sharp geometric distortions, while Smooth produces more gradual bending. Bezier offers additional control when you need to adjust the curvature around individual points.
Using MeshMorph in Premiere Pro
MeshMorph also works in Premiere Pro, with a slightly different setup from After Effects.
In Premiere Pro, the effect is applied directly to a video clip rather than an adjustment layer. You can position the mesh area by dragging its dashed frame inside the Program Monitor.
The main controls remain the same, including Source and Destination meshes, the Amount slider, and the three surface types.
This means you can create and animate mesh distortions directly in your editing timeline without switching to After Effects.
Compatibility and Rendering Support
MeshMorph supports the following software and systems:
After Effects: 2024 or later
Premiere Pro: 2024 or later
Windows: 64-bit
macOS: 11 or later, supporting Apple Silicon and Intel
Color depth: 8, 16, and 32 bpc in After Effects
Rendering: Multi-Frame Rendering and SmartFX
A Flexible Approach to Mesh Warping
The main appeal of MeshMorph is how it combines detailed mesh editing with straightforward animation controls. You can build a complex distortion, animate it using a single slider, and keep the effect connected to the layer as your composition changes.
For motion graphics, text distortion, footage manipulation, and animated shape transformations, it provides a practical way to create mesh-based effects in both After Effects and Premiere Pro.

Files Password : gfxplugin.com OR 123456