Downloadable Files
You can download 3D Onion Skinning for free from the end of this page.
Visualize Your Animation Across Multiple Frames
Getting animation timing right can be surprisingly difficult when you can only focus on one frame at a time. Small problems with spacing, pose transitions, or movement arcs may not become obvious until you play the entire animation.
3D Onion Skinning gives Blender animators a clearer way to study motion by displaying multiple frames around the current frame directly in the 3D scene. Instead of constantly scrubbing backward and forward, you can see how an object or character moves through time at a glance.
This makes it especially useful when refining character animation, motion graphics, game animation, and any project where accurate timing and spacing matter.
See Motion Instead of Just Individual Frames
Onion skinning is a visualization technique that displays previous and upcoming frames alongside the frame you are currently editing. It gives you a visual trail of an object’s movement.
Imagine animating a character jumping. Looking at individual poses tells you what the character looks like at specific moments, but displaying several poses together makes it much easier to understand the complete movement arc.
You can quickly notice whether poses are too close together, whether acceleration feels natural, or whether part of the motion suddenly changes direction.
This visual feedback can improve animation because you are making adjustments based on the overall flow of movement rather than judging isolated frames.
Meet 3D Onion Skinning
3D Onion Skinning is a Blender add-on designed to bring this multi-frame visualization workflow directly into 3D animation.
Built around Python and Blender’s native Geometry Nodes technology, it can bake and display frames before and after your current position while keeping the workflow compact and accessible.
The add-on supports Blender 4.5 LTS and newer versions and does not require external dependencies.
Features
Relative Frame Baking
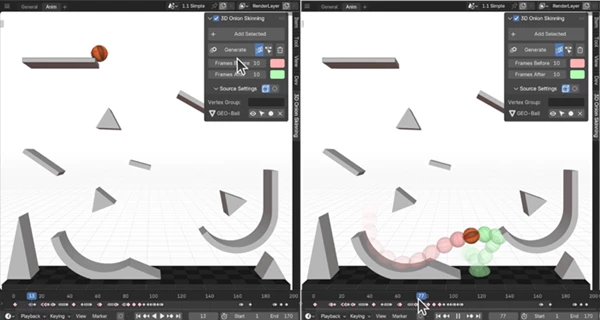
Choose how many frames before and after the current frame should be displayed.
You can customize their colors as well, making previous and upcoming poses easier to distinguish. This is particularly useful when studying timing, spacing, and motion arcs.
For example, while adjusting a character’s arm swing, several visible poses can immediately show whether the motion progresses smoothly or has awkward jumps.
Automatic Updates When Frames Change
3D Onion Skinning can automatically refresh after you move between frames using keyboard controls or timeline scrubbing.
Updates are avoided during playback, allowing you to watch the animation without unnecessary repeated processing.
It also supports the Timeline Scrub functionality from Blender’s Grease Pencil Tool built-in add-on.
Auto-Update While Tweaking Animation
The visualization can refresh when you add, remove, or move keyframes and graph handles.
This means you can adjust an animation and immediately inspect how those changes affect the surrounding motion without repeatedly switching frames just to refresh the onion skin.
Solid and Render Mode Visualization
Onion skins aren’t restricted to a single viewport workflow.
The add-on can generate translucent materials with customizable colors, fading, and opacity for use in Solid View and Render modes. This helps keep multiple frames readable even when several poses overlap.
Broad Object Support
The tool supports meshes, curves, surfaces, fonts, metas, and even instanced collections.
It can also work with library overrides and linked data, making it more practical for larger production scenes rather than limiting the workflow to simple standalone objects.
Vertex Group Support
Sometimes you don’t need to visualize an entire model.
Vertex group support lets you target specific areas of geometry. For example, you could focus on a particular moving section instead of filling the viewport with unnecessary onion-skin geometry.
Object-Level Control
Specific objects can be temporarily bypassed while remaining ready for later use.
This becomes especially helpful in complex multi-object scenes where displaying onion skins for every animated element would create visual clutter.
Decimated Sources
Decimated sources help optimize onion generation, which can be valuable when working with detailed models or wider animation ranges.
Compact and Flexible Interface
The interface is designed to stay out of the way of an already crowded Blender workspace.
You can even avoid keeping it permanently visible in the Side Panel and instead open the tool with Ctrl + Shift + Alt + O. The shortcut is customizable, and operations can also be assigned to your preferred shortcuts.
Animation on Twos
The tool can be useful for animations created “on twos,” where poses are held across multiple frames.
This can also reduce unnecessary baking while still giving you a useful visualization across wider ranges of motion.
Where 3D Onion Skinning Can Make a Difference
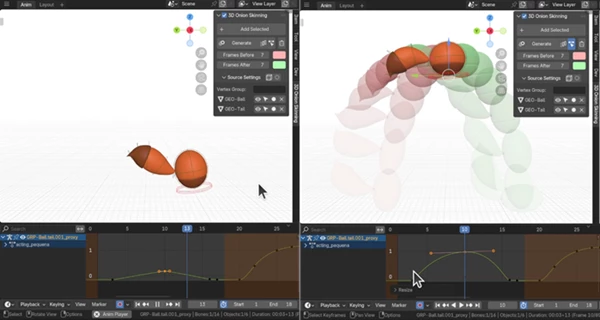
For character animation, displaying neighboring poses can help reveal inconsistent spacing between key poses.
For motion graphics, it becomes easier to inspect complicated object transitions and understand the overall trajectory of animated elements.
For game animation, you can examine attacks, jumps, movement cycles, or other gameplay animations and fine-tune their motion before export.
For students and educators, multi-frame visualization provides a practical way to study classic animation principles such as spacing, timing, arcs, acceleration, and pose-to-pose movement directly inside a 3D environment.
Tips for a Cleaner Onion Skinning Workflow
Start with a relatively small number of surrounding frames. Too many visible poses can make the viewport difficult to interpret, particularly with detailed characters.
Use clearly different colors for previous and upcoming frames. When the visual distinction is immediate, understanding the direction and progression of movement becomes much easier.
Adjust opacity and fading according to the complexity of your scene. Current animation elements should remain easy to identify even when several onion skins overlap.
For heavy scenes, consider using decimated sources or focusing visualization on specific objects and vertex groups. You often don’t need every piece of geometry visible to understand the motion.
When polishing animation, pay particular attention to the distance between consecutive poses. Large gaps suggest faster movement, while tighter spacing suggests slower movement. Seeing those relationships simultaneously is one of the biggest advantages of onion skinning.
A Clearer Way to Refine 3D Animation
3D onion skinning allows animators to instantly view the animation frames surrounding the current frame that is being edited within Blender. This avoids the need to repeatedly scrub through the animation to preview the current object’s animation.
Using techniques like relative frame baking, automatic updates, customizable visualization, object selection, vertex groups, decimated objects, and using native Blender technology, this technique can be used for learning about animation as well as animating projects.
For projects that rely upon precise timing, spacing, and flow of the animated characters, viewing the characters on multiple frames at once can help to fix animation issues and improve the characters’ movements.

Files Password : gfxplugin.com OR 123456