Downloadable Files
You can download Unrender for free from the bottom of this page.
Smarter Color Correction Without the Usual Hassle
Getting balanced color and exposure across an entire video can take a surprising amount of time. Different lighting conditions, bright windows, mixed color temperatures, skin tones, and scene changes often require individual adjustments before the footage starts to feel consistent.
Unrender approaches this process differently. It is an automatic color correction plugin powered by its own trained machine learning model. Instead of applying the same preset to every frame, it analyzes the footage, detects real cuts, and makes scene-specific decisions about color, exposure, skin, and depth.
The result is a strong corrected starting point that you can still customize with familiar sliders.
What Is Unrender?
Unrender is an intelligent color correction and footage-processing tool designed to analyze what is actually happening inside each shot.
Rather than simply changing contrast, saturation, or white balance globally, it considers several parts of the image together. It can identify faces, analyze skin separately, estimate depth, recognize exposure problems, and distinguish the subject from the background.
This matters because correcting one element can easily damage another. Removing a strong color cast, for example, might make the room look better while pushing skin tones too far. Increasing exposure for a dark frame might brighten the background correctly but overexpose the person’s face.
Unrender solves color, light, skin, and depth together, helping corrections remain visually connected and natural.
From Raw Footage to a Better Starting Point
One of the most useful aspects of Unrender is its scene-based workflow.
The plugin reads the clip and identifies actual cuts. Each scene is then analyzed independently, allowing a new correction to be created when the visual conditions change.
Imagine an interview where one shot is recorded beside a bright window and another is filmed in a darker room. Treating both shots with exactly the same correction would rarely produce ideal results. Unrender can analyze each scene separately while keeping its decisions stable throughout individual shots.
This also helps prevent distracting grade changes or flickering during a continuous scene.
Features
Automatic Color Correction
Unrender detects unwanted color casts caused by rooms, windows, mixed lighting, and other environmental conditions.
Instead of blindly neutralizing every dominant color, it is designed to preserve intentional elements such as warm lighting, colored stage lights, and graphics.
This can create a cleaner image without removing the atmosphere that was intentionally captured during production.
Intelligent Exposure Analysis
Exposure decisions are not based only on the average brightness of the entire frame.
Unrender analyzes the face first and then considers the rest of the image. This is especially useful when a subject is standing in front of a bright window or another strong light source.
Traditional automatic exposure may see the bright background and leave the person too dark. By giving more importance to the subject, Unrender can produce a more useful correction.
At the same time, it understands that darker scenes should not automatically become bright, daylight-looking images. A night scene can remain visually dark while receiving a more controlled exposure.
Skin and Face Processing
Faces are detected on a scene-by-scene basis, while skin is processed as its own region.
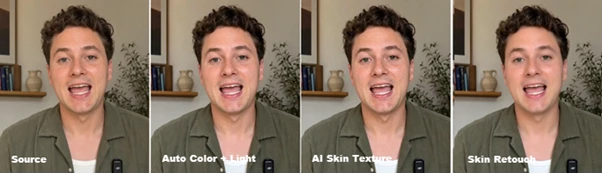
White balance and saturation adjustments can therefore be limited around skin areas. This allows stronger corrections to be made to the environment while keeping the person more natural.
A dedicated Skin Mask view also helps you see exactly which areas are being affected.
For generated footage, Unrender can additionally introduce subtle micro-texture and pore grain to help create a more realistic appearance.
Depth-Aware Grading
Unrender generates a depth map that separates the subject from the background.
This opens the door to adjustments that would normally require additional masks or manual work. With Depth Grade, you can treat the background differently from the subject, while Depth Blur can be used to push the background out of focus.
The Depth Map view lets you inspect this separation before committing to the result.
For interviews, portraits, UGC content, and other subject-focused footage, this can make it easier to guide attention toward the person.
Scene Detection
Unrender automatically splits its analysis at real cuts instead of continuously changing the grade throughout a shot.
Corrections remain anchored during each scene and are recalculated when an actual cut appears.
This provides consistency inside individual shots and reduces the risk of visible grading fluctuations.
One-Click Auto Analyze
The core workflow is designed around Auto Analyze.
With one analysis, Unrender creates its correction and writes the results into ordinary effect parameters. From there, you remain in control.
Nothing is permanently baked into the footage. If you do not like one part of the automatic result, you can reduce its slider or take it completely back to zero.
This makes automation a starting point rather than a replacement for manual creative control.
Machine Learning Advisor
Unrender includes an optional advisor trained using thousands of real camera frames and their corrected versions.
Its understanding of correction therefore comes from photographic examples rather than simply applying a predefined visual preset.
The advisor refines the measured correction when it believes an improvement can be made and stays out of frames where its intervention is unnecessary.
It can also be disabled with a checkbox whenever you prefer to work without it.
Automatic Log Recognition
Working with Log footage normally requires the correct transformation before creative grading begins.
Unrender can recognize a Log signature and automatically enable decoding. You can specify the camera profile for greater precision or reduce the decoding strength when necessary.
This can make mixed-camera workflows and quick corrections considerably easier to manage.
Reference Shot Matching
When several clips need to share a similar appearance, you can capture a source frame and use it as a reference.
The remaining timeline can then be matched toward that frame.
This is useful for interviews, multi-camera projects, social videos, documentary sequences, and other edits where shots captured under slightly different conditions need to feel visually connected.
Custom LUT Support
If you already have a favorite creative LUT, Unrender does not force you to abandon it.
You can load a .cube LUT, control its intensity, and use skin protection to prevent the look from becoming unnecessarily aggressive around people.
The LUT is applied after the correction stage. In practical terms, your creative look starts from a cleaner and more balanced image rather than trying to compensate for problems already present in the original footage.
Realism Tools for Generated Footage
Unrender is not limited to traditional camera footage.
Its correction system can also work with generated video, while optional realism processing can introduce elements such as texture, grain, halation, and sensor-like character.
Because these additions are optional, you can decide whether a project needs a cleaner digital image or a more camera-like finish.
Local Processing
Analysis and rendering are performed locally on the machine.
Footage does not need to be uploaded for processing. According to the provided product information, internet access is only required for license activation.
Practical Ways to Use Unrender
For interviews, start with Auto Analyze and pay particular attention to face exposure and skin protection. If the background is visually distracting, use Depth Grade or a subtle amount of Depth Blur rather than immediately applying aggressive global adjustments.
For phone and UGC footage, automatic color and exposure correction can provide a quick foundation before adding a creative look. This is especially useful when several clips were captured in different locations or under inconsistent lighting.
For documentary projects, scene-based analysis can help when moving between daylight, indoor environments, mixed lighting, and night footage.
For generated video, begin with the standard correction before introducing realism effects. Texture, grain, halation, and similar characteristics usually work better when they are treated as finishing details rather than the foundation of the image.
Tips for More Natural Results
Treat Unrender’s automatic correction as a starting point rather than something that must always remain at maximum strength. Because the generated result stays available through adjustable parameters, you can reduce individual corrections whenever they feel too strong.
Pay special attention to skin. A technically neutral image is not necessarily the most attractive image, particularly with portraits and interviews. Use the Skin Mask to check which areas are protected before making stronger color or saturation changes.
Depth effects should also be used carefully. A subtle separation between subject and background can make an image feel polished, while excessive artificial blur can quickly become noticeable.
When working with multiple shots, choose a strong reference frame with representative lighting and skin tones before attempting to match the rest of the timeline.
Finally, if you plan to use a creative LUT, perform the corrective stage first. Starting from balanced footage gives the LUT a more consistent foundation and usually makes its final appearance easier to control.
A Faster Starting Point for Color Work
Unrender automatically performs color correction, exposure analysis, face and skin analysis, depth analysis, scene detection, Log decoding, shot matching, and LUT support. Unrender analyzes each of the various elements of an image to ensure that the subject, skin tones, background, lighting, and color elements all work together to achieve the best possible color correction of each element of the image.
The automatic color correction performed by Unrender can be edited using the standard color correction parameters of your video editing software, allowing it to be used as a way to quickly apply color correction to your project while still maintaining full control over the final color correction.
Unrender can be used to automatically color correct interview footage, phone camera footage, documentary footage, Log film footage, and even generated video footage.

Files Password : gfxplugin.com OR 123456